Adobe Get Started
This document explains how to install the FlexLink plugin into your Adobe applications to use Flexbar’s Adobe integration features.
Since the FlexLink plugin is built using the legacy Adobe CEP framework, it may not run properly on Apple Silicon devices. We’re actively working on a new UXP version to replace it.
Enable Developer Mode
First, update the following Adobe setting to prevent your host application (Photoshop, InDesign, etc.) from showing warnings about unsigned extensions. Refer to the HTML Extension Cookbook section on Debugging Unsigned Extensions for more details:
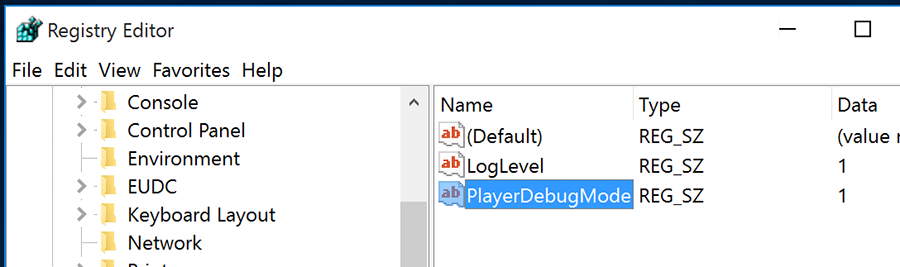
Windows: Open regedit and navigate to
HKEY_CURRENT_USER/Software/Adobe/CSXS.<X>. Add a new string value namedPlayerDebugModeand set it to1.⚠️ Make sure there are no extra spaces in
PlayerDebugMode.
Mac: Open Terminal and run:
defaults write com.adobe.CSXS.12 PlayerDebugMode 1defaults write com.adobe.CSXS.12 AllowUnsignedExtensions -bool true⚠️
CSXS.<VERSION>needs to be adjusted according to your Adobe software version, version 12 for 2025, version 11 for 2024
On Windows, Regedit is located at C:\Windows\regedit. You can open it from CMD or by pressing WIN + R and typing regedit.

On macOS, Terminal is located at Applications > Utilities > Terminal.
Install the FlexLink Plugin
Download and extract the FlexLink archive. Copy the com.eniac.FlexLink-1.0 folder to the appropriate directory:
The paths below are the default install locations for the 2025 versions. Adjust them as needed for your setup.
Windows
Adobe Premiere Pro:
C:\Program Files\Adobe\Adobe Premiere Pro 2025\CEP\extensionsAdobe Photoshop:
C:\Program Files\Adobe\Adobe Photoshop 2025\Required\CEP\extensions
Macos
Adobe Premiere Pro: /Applications/Adobe Premiere Pro 2025/Adobe Premiere Pro 2025.app/Contents/CEP/extensions
Adobe Photoshop: /Applications/Adobe Photoshop 2025/Adobe Photoshop 2025.app/Contents/Required/CEP/extensions You may need to right-click on the application and select “Show Package Contents” to access these folders. Copy the com.eniac.FlexLink-1.0 folder to the extensions directory of the respective application.
Verify Installation
After launching your Adobe application, go to Window > Extensions and look for Flex Link.
You’re all set! Flexbar’s Adobe integration is now ready to use.